Tool Used
Approach
I first had to commit to opening up my Chromebook. Although it was old it still worked, and I knew tearing it down could put it in an unrepairable state. Once I had made up my mind, I opened it and carefully pulled out the keyboard.
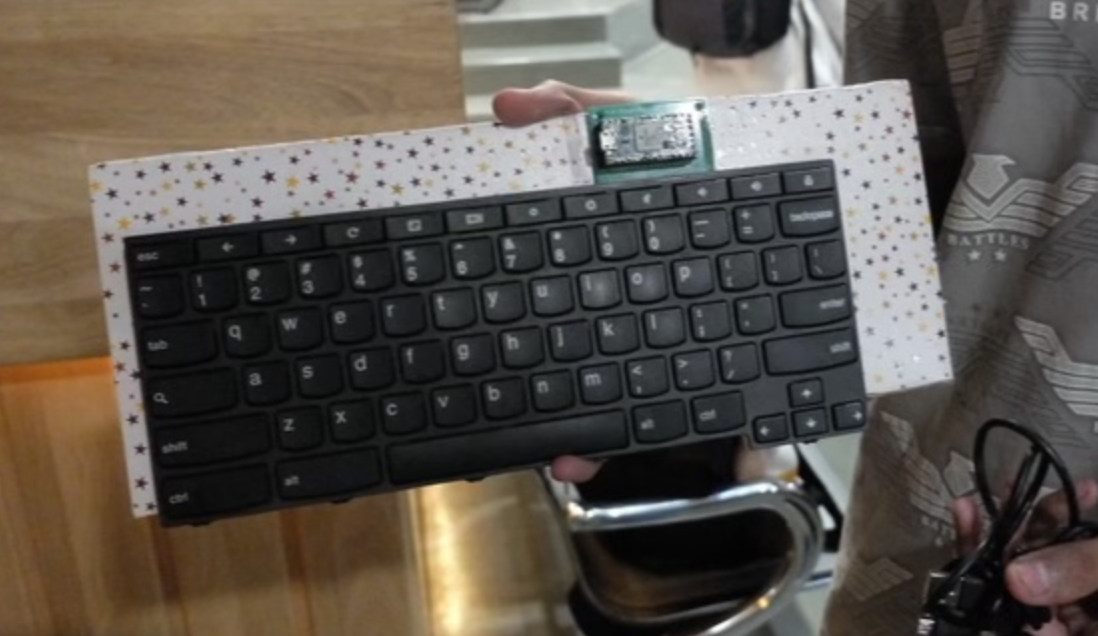
Next, I needed to get the Teensy PCB ready. The guide linked a CAD file to print for the 4.0 so I sent it over to a PCB printer and got the parts within a week. Although the guide suggested soldering the microcontroller directly to minimise vertical height, I wanted to reuse the Teensy later so I soldered some female header pins and attached it that way. The Teensy 4.0 also has pads on the underside, which are not exposed as thru-holes. These pads are also needed because the keyboard pins need to connect to the respective scanner PCB pins. Unfortunately, I pulled a pad out by using too much heat, so I had to route the pin to an adjacent pad.
The way a keyboard works is actually pretty simple. In general, its a 2D matrix of rails (say x and y), where each key electrically sits at an intersection. When a key is pressed the two rails at that point are joined. A controller which has access to all rails can then probe each x rail by pulling it HIGH, and listen on all the y rails for a HIGH signal. If it finds one, then it has both the x and y coordinates of key pressed. If a map of all the coordinates to ASCII keycodes is made, then a simple scanner script can effectively take keyboard input.
The Teensy is special as it has the capability to register itself on a USB bus as an HID (Human Interface Device). This means connected hosts like desktops will treat it like an input device and with the right code, the Teensy can emulate a keyboard. The guide linked above already did all the hard work of writing the scanning script and even made scripts to label keys easily, so all I had to do was flash through the code, set up the keyboard map and enjoy!
Challenges
A significant hurdle was finding the right FPC connector. These connectors are far from standardised, and come in varying pitches, types and heights. The part itself would cost pennies but finding the right one, and buying in bulk + shipping was a headache.
So, as recommended by the guide, I decided to just reuse the original FPC by desoldering it from the Chromebook keyboard and resoldering onto the scanner PCB. "How hard could removing a tiny plastic component be?" - Very hard... Without a hot air station and an aggressively hot soldering iron, it was inevitable that I would burn the plastic and render both the connector and the laptop's keyboard input useless. I went and probed at the FPC anyways and it melted.
(Now my Chromebook sits idly in the shelf, no way to replace ChromeOS either as recovery mode requires a keyboard key!) I cut my losses, and accepted defeat. Soon after went to a laptop repair shop to find an alternate FPC with the right pitch to harvest of off their scrap boards. Luckily they had a longer one with the same pitch, so it was possible to connect my cable with some extra pins left next to it. This is what I should have done from the start...
The second problem ended up destroying all further possibilities of this project. The pads on the keyboard's FPC cable wore off with my repeated testing! I really should have seen this coming, but now, without a good connection to the keyboard rails, the number of keys the Teensy can detect reliably is a whopping 5.
Next Steps
I really feel like someone should quote 'If it ain't broken, don't fix it', at the end of this journey. Agreed, it was a disappointing end which sent both my Chromebook and its keyboard out of commission, but what I gained was far more valuable. Opening and exploring laptop internals was extremely fun and this 'failure' allowed my to build better intuitions and understand my limits when it comes to working with hardware. It gave me an immense sense of accomplishment for the first few days when I was able to reliably use the keyboard for data entry.
This project is likely certainly dead, as reviving the keyboard now would mean applying a solder mask on the cable, and either directly soldering it to the PCB pads or still keeping the FPC connector in the middle. It *might* be possible to expose the traces further down the cable, but that's at risk of even more damage.
As for the Chromebook, hoping to be able to use it with the keyboard is pretty much out of the question, but since I do have the keyboard mapping, I could completely desolder the melted FPC and short the pins for the recovery key to flash Coreboot and get Debian running on it again. (I say again as I had managed to do so before, but reverted to ChromeOS just before messing up the keyboard)
Now, if someone were to lend me a spare Chromebook 11e keyboard then the future would look a little brighter.